I attached the RadioFlyer enclosure (for the Via / Via-Pro) to my Xtracycle Hopper with decent success!
I had to modify things a bit, but nothing beyond unscrewing things that I'm not supposed to. (Nothing like 3d printing or welding or whatever.)
Below are some pics and brief description as well as first impressions.
(Sorry for the photo clutter -- this wasn't a very intentional photo shoot.)
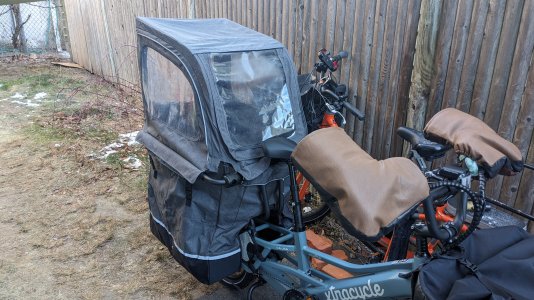
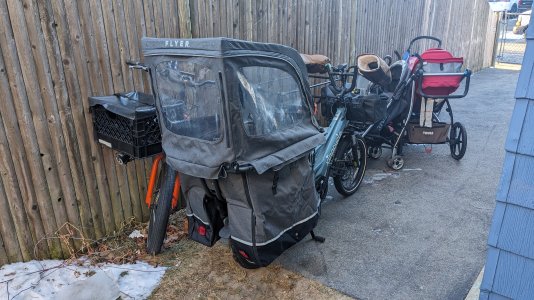
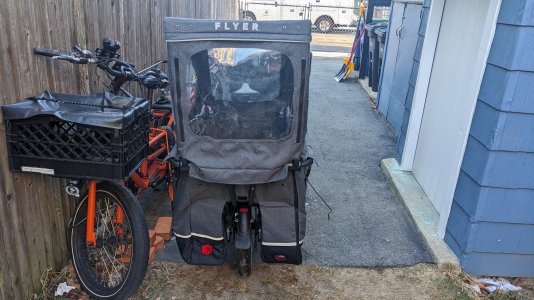
With RadioFlyer's enclosure, you have to enter from below -- that's the design. It's worked well for the kids, but it's a bit of a pain for throwing in cargo. I had to remove the interior Hooptie hand rails for compatibility (I'll explain later), which opens up the pass through enough for kids to enter/exit with helmets and to fit through cargo. (They have to take off their backpacks to pass them through.)
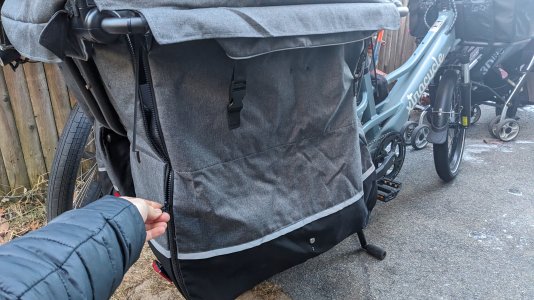
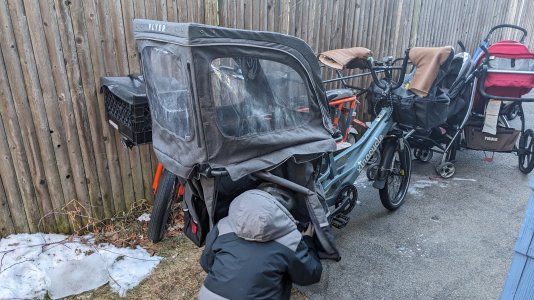
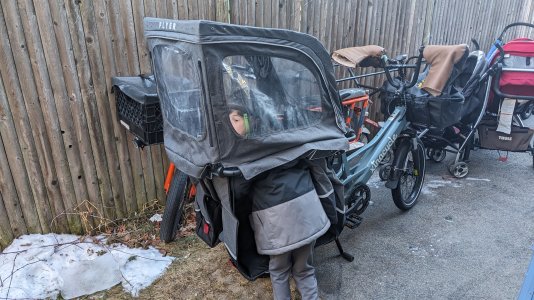
The enclosure's attachment brackets basically fit the Hooptie bars, but they conflict with the interior Hooptie handrail, so I removed the Hooptie handrails. (This removal is probably essential anyways, in order to use the lower entrance, shown above.) You could certainly come up with a more elegant solution, but this was pretty quick and easy. There may be some risk to kids fingers like this, but my kids don't really reach through and expose theirs, so it seems pretty low risk... I hope.
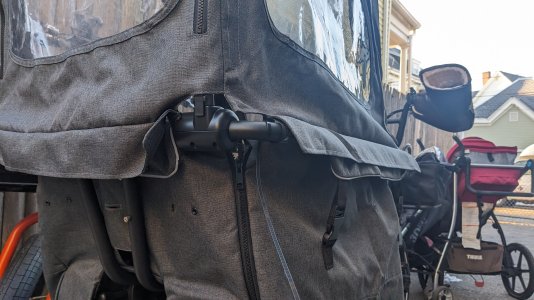
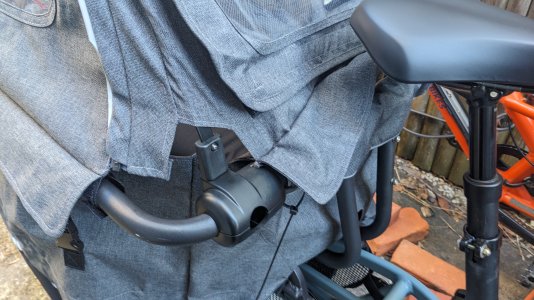
I actually reversed the direction of the RadioFlyer mounting brackets and respective upper-frame clips on the front side (shown above), to shorten the length of the frame. Shortening the length by that ~1.5" had a large beneficial impact on the fit, and I highly recommend doing it.
That being said, I discovered that rain can seep in between the top and bottom behind the saddle (shown below), so I intend to undo the flip on the front two brackets, and try flipping the rear brackets instead. I expect that will work better, but I haven't tested it yet. (I had originally flipped the front brackets, rather than the rear brackets, thinking that it would be good to have additional space behind the saddle for the adult to wear a backpack and that it would be good to have the full-height of the enclosure further back for the children.)
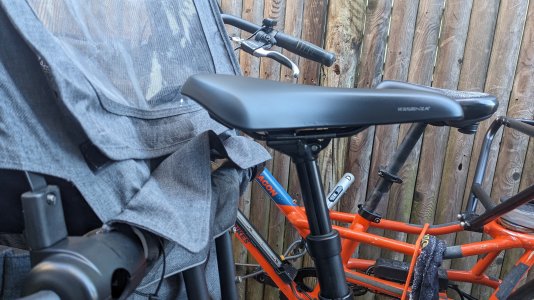
In general, there are gaps which mostly don't leak rain, but certainly let some air through. (You can see it in the above photos of the brackets.) If the cover were designed for this bike, I'd be disappointed, but it's not. (I'd be very curious to see the RadioFlyer enclosure on an actual RadioFlyer Via.) I've taken it out in a torrential downpour and the kids were nice and dry for a ~30 minute ride, although they said it was leaking in a spot. The next day, after sitting in the rain all day, however, I found that the seat had eventually become soaked.
There is a part on the interior that is designed to straddle under the bench and zip on the opposing side to help support weight while loading the bottom with groceries, etc.. Because there are obstructions under the Hopper's seat, I just left it dangling, and am lacking that support. Probably, I should sew some straps to run through under the seat, but you know, it seems kind of fine? This may come to bite me later but it's been fine so far, at least using the enclosure primarily for weather protection. I haven't been loading it up too much with cargo.
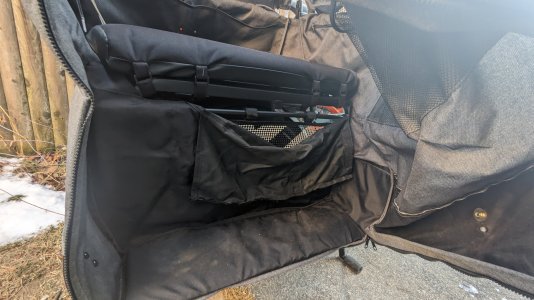
The other enclosure out there, of course, is the Tern Storm Box with Storm Shield. That appears to be a superior product, but I was told by a friend that it doesn't really fit the Hopper, because of the Hopper's large rear bench, so I didn't even attempt it myself. I wanted to be able to use all the rear area possible, and the RadioFlyer Via / Via Pro's rear area is almost the exact same size as the Hopper's. Additionally, the mounting hardware is almost compatible, making it pretty easy to use. While RadioFlyer's enclosure doesn't seem as sturdy as Tern's, it still appears to be quality made with decent materials.
All in all, even with the various flaws, I have found that RadioFlyer's enclosure works great at the main goal of keeping my kids comfortable in harsh weather -- and this has been quite problematic in the past. I'm overall thrilled with the results, considering the minimal effort and lack of great options.
I had to modify things a bit, but nothing beyond unscrewing things that I'm not supposed to. (Nothing like 3d printing or welding or whatever.)
Below are some pics and brief description as well as first impressions.
(Sorry for the photo clutter -- this wasn't a very intentional photo shoot.)


With RadioFlyer's enclosure, you have to enter from below -- that's the design. It's worked well for the kids, but it's a bit of a pain for throwing in cargo. I had to remove the interior Hooptie hand rails for compatibility (I'll explain later), which opens up the pass through enough for kids to enter/exit with helmets and to fit through cargo. (They have to take off their backpacks to pass them through.)


The enclosure's attachment brackets basically fit the Hooptie bars, but they conflict with the interior Hooptie handrail, so I removed the Hooptie handrails. (This removal is probably essential anyways, in order to use the lower entrance, shown above.) You could certainly come up with a more elegant solution, but this was pretty quick and easy. There may be some risk to kids fingers like this, but my kids don't really reach through and expose theirs, so it seems pretty low risk... I hope.


I actually reversed the direction of the RadioFlyer mounting brackets and respective upper-frame clips on the front side (shown above), to shorten the length of the frame. Shortening the length by that ~1.5" had a large beneficial impact on the fit, and I highly recommend doing it.
That being said, I discovered that rain can seep in between the top and bottom behind the saddle (shown below), so I intend to undo the flip on the front two brackets, and try flipping the rear brackets instead. I expect that will work better, but I haven't tested it yet. (I had originally flipped the front brackets, rather than the rear brackets, thinking that it would be good to have additional space behind the saddle for the adult to wear a backpack and that it would be good to have the full-height of the enclosure further back for the children.)

In general, there are gaps which mostly don't leak rain, but certainly let some air through. (You can see it in the above photos of the brackets.) If the cover were designed for this bike, I'd be disappointed, but it's not. (I'd be very curious to see the RadioFlyer enclosure on an actual RadioFlyer Via.) I've taken it out in a torrential downpour and the kids were nice and dry for a ~30 minute ride, although they said it was leaking in a spot. The next day, after sitting in the rain all day, however, I found that the seat had eventually become soaked.
There is a part on the interior that is designed to straddle under the bench and zip on the opposing side to help support weight while loading the bottom with groceries, etc.. Because there are obstructions under the Hopper's seat, I just left it dangling, and am lacking that support. Probably, I should sew some straps to run through under the seat, but you know, it seems kind of fine? This may come to bite me later but it's been fine so far, at least using the enclosure primarily for weather protection. I haven't been loading it up too much with cargo.

The other enclosure out there, of course, is the Tern Storm Box with Storm Shield. That appears to be a superior product, but I was told by a friend that it doesn't really fit the Hopper, because of the Hopper's large rear bench, so I didn't even attempt it myself. I wanted to be able to use all the rear area possible, and the RadioFlyer Via / Via Pro's rear area is almost the exact same size as the Hopper's. Additionally, the mounting hardware is almost compatible, making it pretty easy to use. While RadioFlyer's enclosure doesn't seem as sturdy as Tern's, it still appears to be quality made with decent materials.
All in all, even with the various flaws, I have found that RadioFlyer's enclosure works great at the main goal of keeping my kids comfortable in harsh weather -- and this has been quite problematic in the past. I'm overall thrilled with the results, considering the minimal effort and lack of great options.
