CycloCrux
New member
- Feb 9, 2025
- 11
- 17
After countless near misses in my life, and a few years of off-and-on running CycleIQ and GoPros, I decided that I wanted something a little more fixed in place for my cargo bike. This serves as an overview of how I decided on the model and how it was installed.
Some sample footage can be found here, one from the worst conditions (low light, rain) and another from not great conditions (daylight, rain)
I'm not going to read all that, just give me the high notes:
I won't recommend a specific model (and have mixed views on the one I did end up with), but these are the parameters I used to narrow my search:
Don't skip this step. You'll discover that some cable doesn't fit through a gap, the camera needed more space than you accounted for, or you need to manage your cables under the deck instead of inside the box. Rough in everything, check fit and clearance. Make sure your cables are long enough. Make sure you locate anything that needs to be accessed (remote control, controller box, microSD slot) in a way that is accessible for you.

This is also the time to solder or join your accessory cable to the power supply cable from your chosen camera. If you're not comfortable with soldering, use butt connectors of the appropriate gauge. Make sure do get everything hidden with heatshrink to help with longevity and prevent shorts.
Step 3B: Test your camera
Plug the fully assembled camera into the accessory port. Do this with batteries removed and power off. Turn it all on and do a full functionality test before running wires elsewhere.
Step 4: Install
This might vary depending on your chosen dashcam, but the broad strokes should be applicable

Step 5: Just ride
If your dashcam is wired up and has the same basic functionality as mine, it just turns on when the bike turns on, recording all of your riding and hopefully no near misses (thinking on the positives of Murphy's law). You can probably get creative and wire the power into a relay and have the dashcam come on with the lights, but I don't believe in complexity where there is a simple solution, especially for something I want to set and forget.
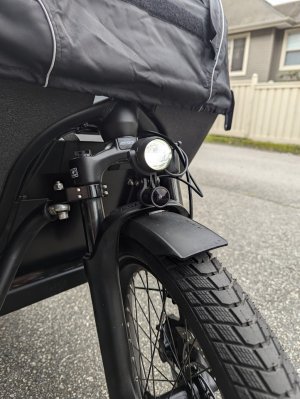
You can't even tell it's there.

Happy to answer any questions.
Some sample footage can be found here, one from the worst conditions (low light, rain) and another from not great conditions (daylight, rain)
I'm not going to read all that, just give me the high notes:
- I used an Aliexpress motorcycle dashcam running on 12V. The specific model is the Vsysto Q6L. It must run on 12V and must have <10W total consumption.
- You will need the right accessory plug from Bosch. This was oddly hard to track down. Supernova was the best source.
- Upfront planning on mounting and cable management is essential.
- You will have too many and too long cables. Have a place to hide them.
I won't recommend a specific model (and have mixed views on the one I did end up with), but these are the parameters I used to narrow my search:
- Must run off the Bosch Accessory Port (Gen 4 Performance Line CX Cargo). If you have a different generation or different motor you will need to figure this out for yourself. On mine (and I believe all Gen 4) this is 12V, 1A, but can only delivery 10W peak. I don't believe that the rear light circuit can be used at all (too low amperage) and the front light is also not designed for this power usage (definitely not while also using the light). You can run these cameras using a DC-DC transformer directly off the battery, but I do not recommend this unless you're both very electronics savvy (safety) and willing to sacrifice a functional motor or battery because the brains detect a flaw due to voltage drop.
- The dashcams has a few required features:
- Meets the above requirements
- Front and Rear camera. You could go with just one to save power
- Has versatile mounting options. Whether VHB tape to a good surface, an easily 3D printable mount that integrates with your lights or rack, or something you can easily bolt to a stay, you need it to stay where you put it and point it. Ideally it should also have some degree of vibration mitigation (OIS, in the mount, or both)
- Wifi access. This is optional, you could choose to pull the memory card to retrieve footage. I wasn't going to pull out the child seat to get at it every time I had a near miss.
- Good waterproof rating. The controller will live in the safety of my front box, but it's a bike and we ride in the rain.
- No extra power draws. No GPS, no screen. You might want these things, that's up to you.
- Some dashcams have crash detection. I haven't tested this in mine, I'm skeptical that it picks up crashes on a bike.
- This is easy, just order the parts you've settled on.
- Ensure you get the right adapter cable for your accessory port. I found this a bit tricky because Bosch's public facing documentation isn't amazing. Supernova was, however, reliable for this type of accessory
Don't skip this step. You'll discover that some cable doesn't fit through a gap, the camera needed more space than you accounted for, or you need to manage your cables under the deck instead of inside the box. Rough in everything, check fit and clearance. Make sure your cables are long enough. Make sure you locate anything that needs to be accessed (remote control, controller box, microSD slot) in a way that is accessible for you.

This is also the time to solder or join your accessory cable to the power supply cable from your chosen camera. If you're not comfortable with soldering, use butt connectors of the appropriate gauge. Make sure do get everything hidden with heatshrink to help with longevity and prevent shorts.
Step 3B: Test your camera
Plug the fully assembled camera into the accessory port. Do this with batteries removed and power off. Turn it all on and do a full functionality test before running wires elsewhere.
Step 4: Install
This might vary depending on your chosen dashcam, but the broad strokes should be applicable
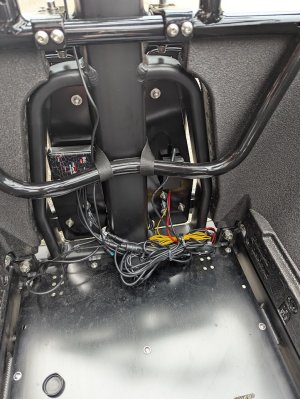
- Install the controller. Mine was VHB taped to the back panel inside my front box. This also included managing the remote, power adapter, and wifi antenna.
- Install the cameras, ensuring any cable routing happens for the first length of cable attached to the camera.
- Install the accessory/power cable. I needed to run my cable from the box down rather than from the accessory port up because of the size of camera connectors. Be mindful of this.
- Install and zip-tie all the cables, keeping excess length to wherever you intend to keep it. It was easy for me to just zip tie the cables alongside the existing front brake and light run. The rear required a bit more finagling as I couldn't fit the connectors through the frame ports, and opted for some less attractive routing, hiding as much as I could on stays.
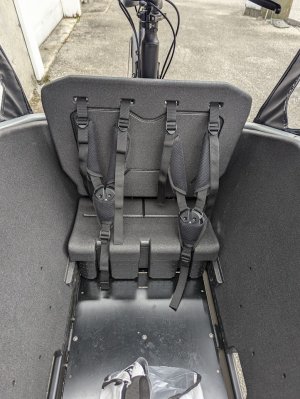
- Cable manage. This part kind of sucks, but creating a tidy bundle of cables really is critical. On my bike they sit nicely underneath the child seat in the box.

Step 5: Just ride
If your dashcam is wired up and has the same basic functionality as mine, it just turns on when the bike turns on, recording all of your riding and hopefully no near misses (thinking on the positives of Murphy's law). You can probably get creative and wire the power into a relay and have the dashcam come on with the lights, but I don't believe in complexity where there is a simple solution, especially for something I want to set and forget.
You can't even tell it's there.

Happy to answer any questions.
Last edited:
